Ⅰ. VRPN Function Introduction
Ⅰ. XINGYING Installation
-
On a 64-bit Windows operating system, close the firewall and exit antivirus software (360, PC Manager, etc.), right-click and select "Run as administrator" to run "XINGYING 4.0.0.*** exe", and the installation interface will pop up.
-
Follow the prompts, select the installation language, and click "Next" to proceed with the installation. Some computers may require the installation of Windows runtime libraries, select the default installation. After installation, a software icon will appear on the desktop.
Ⅱ. XINGYING Network Settings
(Ⅰ) Computer Network Settings
Configure the local connection on the computer. Taking Win10 as an example, click in sequence: "Control Panel - Network and Internet - Network and Sharing Center - Change adapter settings - Ethernet (right-click) - Properties - Double-click Internet Protocol Version 4 - Use the following IP address", set the IP address to 10.1.1.198, subnet mask to 255.255.255.0, no other settings are needed, click OK (3.1.1).
(Ⅱ) Enable VRPN Function
Open the data broadcast panel in the XINGYING software view, select the IP address in the "Network Card Address" dropdown box, select 10.1.1.198. Check VRPN to enable, and click play.
Ⅲ. Testing VRPN Data Acquisition on Windows System
(Ⅰ) Start VRPN Service to Get Data
-
After completing the corresponding configuration settings, play in real-time mode and quickly create a Markerset, or load data in post-processing mode. For the method of creating a Markerset, please refer to the user manual.
-
After checking the SDK function and VRPN function, enter the path of "NokovVrpnClient.exe" in the Windows terminal and run "NokovVrpnClient.exe" to get data. After successfully receiving data, XINGYING's VRPN data is successfully started. If data cannot be received, please check whether the VRPN configuration and IP address in XINGYING are correct. (For the "NokovVrpnClient.exe" executable program, please consult technical engineers).
Ⅳ. VRPN Introduction
(Ⅰ) Types
VRPN can be divided into three types: Rigid Body, Marker Point, and Marker Point (Unnamed).
- Before checking VRPN functions and modifying values, please pause the software first, uncheck "Enable VRPN" in data broadcast, then check functions and modify values. After checking the functions, please check "Enable VRPN" and play the software.
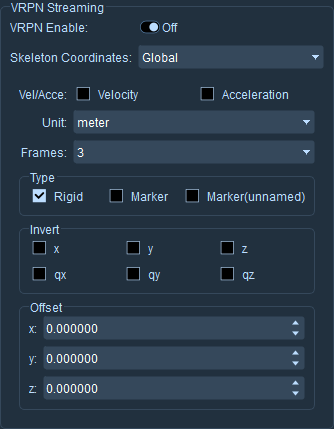
Enable VRPN
- Rigid Body Type:
- Rigid body type indicates sending rigid body information data. Quickly create a rigid body in XINGYING, select "Rigid Body" type, enable VRPN, and play the motion capture software. In the Ros2 terminal, enter "ros2 launch vrpn_client_ros sample.launch.py". After obtaining motion capture data, open another terminal and enter "ros2 topic list" to see the rigid body topics printed in the terminal. Enter "ros2 topic echo + topic name", and the terminal will print the data of that topic;
- Marker Point Type
- When the marker point type is checked, it indicates sending named Marker point information data. After creating a Markerset, select "Marker Point" type, enable VRPN, play the motion capture software, enter commands in the Ros2 terminal to start Ros2, and after obtaining motion capture data, open another terminal and enter commands to subscribe to marker point topics. "Tracker0_Marker1" means "Tracker0" is the Markerset name, and "Marker1" is the name of the first point of the Markerset. If you need to get the data of the second point of the Markerset, just change "Marker1" to "Marker2", and so on. After entering the command "ros2 topic echo /Tracker0_Marker1/pose" and pressing Enter, you can see the data of the "Marker1" point of "Tracker0";
.png)
Enter Coordinates
.png)
Draw
- Marker Point (Unnamed)
- Marker point (unnamed) indicates sending unnamed Marker point information data. Select "Marker Point (Unnamed)" type, enable VRPN, and play the motion capture software. Enter commands in the Ros2 terminal to start Ros2, and after obtaining motion capture data, open another terminal and enter commands to subscribe to unnamed point topics. After entering the command "ros2 topic echo /U_Tracker0/pose" and pressing Enter, the terminal will print unnamed point data. "U_Tracker0" represents the first unnamed point. To get the information data of the second unnamed point, you can change "U_Tracker0" to "U_Tracker1", representing the second unnamed point.
.png)
Print Trajectory
.png)
Draw Trajectory
(Ⅱ) Velocity and Acceleration
- After checking "Velocity" in XINGYING software, enter commands in the Ros2 terminal to get topics. "twist" represents velocity. Enter the command "rostopic echo /Tracker4/twist" and press Enter, and the terminal will print the velocity data information of the rigid body "Tracker4";
- After checking "Acceleration" in XINGYING software, enter commands in the Ros2 terminal to get topics. "accel" represents acceleration. Enter the command "rostopic echo /Tracker4/accel" and press Enter, and the terminal will print the acceleration data information of the rigid body "Tracker4";
- Frames represents the frame factor, which is used for velocity calculation. You can adjust this value in the dropdown box to make the actual velocity value close to the output velocity value.
(Ⅲ) Units and Inversion
- Different units can be changed in the unit dropdown box, divided into "millimeters, centimeters, meters". Pause motion capture → open data broadcast, select the unit to change in the unit dropdown box → enable VRPN → click play. After changing the unit, the unit of "Position" data printed in Ros2 will also change in real time, which can be used with the three types of VRPN;
- Check "X, Y, Z" in "Inversion" to reverse the sign of position data of the three VRPN types. If the "Position" data in Ros2 is positive before checking, it will become negative after checking. After checking, the X, Y, Z coordinate data of "Position" in Ros will be reversed;
- "qx, qy, qz" represents the inversion of orientation rotation data. After checking, the X, Y, Z coordinate data of "orientation" in Ros2 will be reversed.
(Ⅳ) Offset
- In "Offset", you can set the "X, Y, Z" coordinate offset of variable data (as shown in Figure 29). Pause the software → open data broadcast → modify the X, Y, Z coordinate offset in the "Offset" value input box → enable VRPN → click play. After modifying the coordinate offset value, the modified value will be added to the X, Y, Z coordinate values of "Position" in Ros2.